Why Your Keto Cheese Crust Is Always Too Greasy

In this guide, you will learn exactly why your low-carb cheese crusts end up oily and how to fix the science of fat emulsification to achieve a crispy, structural base.
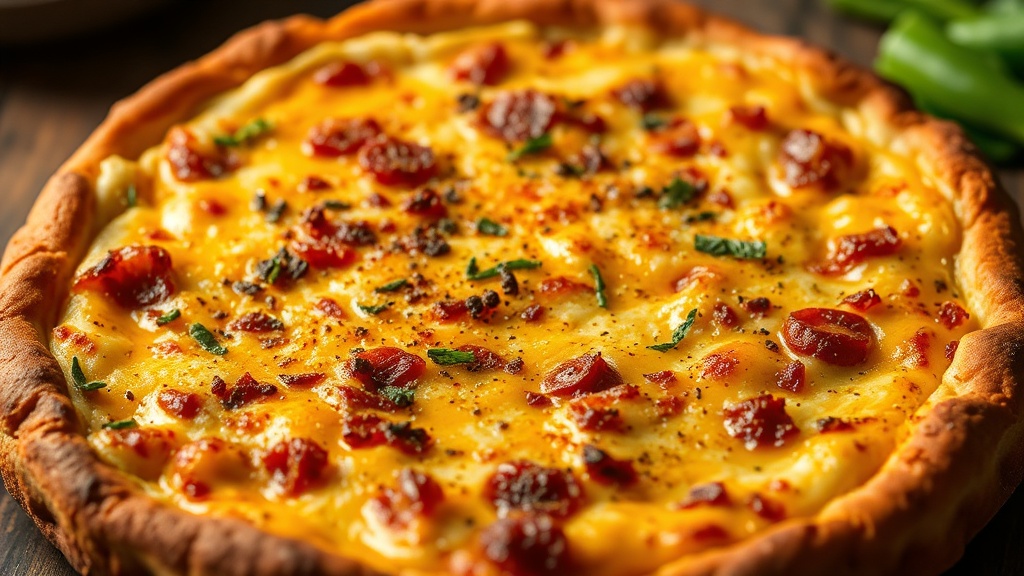
If you have ever attempted to make a keto pizza crust or a savory cheese cracker and ended up with a puddle of orange oil on your baking sheet, you aren't doing anything "wrong"—you are simply battling the physics of fat and moisture. A successful cheese crust relies on a delicate balance of protein structure and fat stability. When that balance fails, the fat separates from the protein, leaving you with a greasy mess instead of a structural base. Understanding the role of cheese types, temperature, and moisture content is the only way to ensure a consistent, edible result.
The Science of Fat Separation
To fix a greasy crust, you must first understand why the fat escapes. Cheese is an emulsion of milk proteins (casein), water, and milk fat. When you apply heat, the protein structure begins to relax and expand. If the heat is too high or the cheese is too low-quality, the protein network collapses before it can set. Once that network collapses, it can no longer hold the liquid fat in place, and the oil "leaks" out. This is the same phenomenon that occurs when keto mayonnaise breaks or curdles, though in the case of cheese, the culprit is heat-induced structural failure rather than emulsion instability.
There are three primary culprits behind this separation:
- High Moisture Content: Cheeses like fresh mozzarella or low-moisture mozzarella (often used in standard grocery stores) contain significant water. As the water evaporates during baking, it creates steam that pushes the fat out of the protein matrix.
- Excessive Heat: If your oven temperature is too high, the fat reaches its melting point and liquefies before the proteins have a chance to undergo the Maillard reaction and solidify into a crust.
- Poor Protein-to-Fat Ratio: Cheeses with very high fat content but low protein content (like many processed "cheese food" products) lack the structural integrity needed to form a solid crust.
Choosing the Right Cheese for Structure
Not all cheeses are created equal when it comes to baking. If you want a crust that holds its shape and stays relatively dry, you need to prioritize cheese with high protein density and controlled moisture levels. Avoid using "shredded" cheese directly from a bag if possible. Most pre-shredded cheeses, such as those from brands like Kraft or Sargento, are coated in potato starch or cellulose to prevent clumping. While this is fine for a standard pasta dish, in a keto crust, that starch can interact poorly with the fats, or the extra coating can actually trap moisture, leading to a soggy, greasy center.
The Best Options:
- Parmesan (Parmigiano-Reggiano): This is the gold standard for cheese crusts. It is a hard, aged cheese with very low moisture and high protein. It provides the structural "glue" needed for a crispy base.
- Sharp Cheddar: A high-quality, aged cheddar has less water than a mild cheddar. The higher the age, the more the moisture has evaporated, making it more stable under high heat.
- Mozzarella (Low-Moisture): If you must use mozzarella for that classic "stretch," ensure you are using the firm, block-style low-moisture version, not the fresh balls found in liquid brine.
The Worst Options:
- Fresh Mozzarella: Too much water content will lead to a greasy, weeping mess.
- Processed Cheese Slices: These contain emulsifiers and additives that are designed to melt smoothly, but they lack the protein structure to form a rigid, crispy crust.
- Cream Cheese: While great for keto baking, using too much cream cheese in a crust will result in a soft, heavy texture that never truly "crisps" up.
The Temperature Paradox
One of the most common mistakes is the assumption that a higher temperature equals a crispier crust. In a standard wheat-based crust, high heat helps the crust set quickly. In a cheese-based crust, excessive heat is your enemy. If your oven is set to 450°F (232°C) or higher, the fat in the cheese will liquefy and pool almost instantly. By the time the cheese has turned golden brown, the oil has already separated and coated your baking sheet.
The Ideal Method: Aim for a moderate temperature, typically between 375°F (190°C) and 400°F (205°C). This allows the moisture to evaporate at a controlled rate and gives the proteins time to form a solid lattice before the fat becomes too fluid. If you are using a pizza stone, ensure it is preheated thoroughly, but do not be afraid to pull the crust out of the oven early if you see oil pooling at the edges.
Step-by-Step Technique for a Non-Greasy Crust
To ensure your crust is successful, follow this specific workflow. This method focuses on building layers and managing moisture from the start.
1. Grate Your Own Cheese: Buy a block of aged cheddar or parmesan and grate it yourself using a box grater. This avoids the anti-clumping starches found in pre-shredded bags and ensures you are using pure cheese.
2. Use a Parchment Paper or Silicone Mat: Never spread your cheese directly onto a metal baking sheet. The cheese will stick to the metal, and the heat transfer will be too aggressive. Use high-quality parchment paper (like Reynolds Kitchens) or a silicone baking mat. This provides a slight buffer and makes it much easier to lift the crust once it is done.
3. The "Pre-Bake" Phase: This is the most critical step. Most people try to bake the toppings and the crust at the same time. This is a mistake. You should bake the cheese crust by itself first. Spread your grated cheese in a thin, even layer on your parchment paper. Bake this "base" until it is golden brown and the edges look firm. This allows the moisture to escape and the structure to set before you add any heavy or wet toppings.
4. Adding Toppings Strategically: Once your crust is partially cooked and firm, remove it from the oven. Add your toppings—such as pepperoni, herbs, or cooked vegetables—and return it to the oven for just a few minutes to melt the toppings. If you add wet ingredients like tomato sauce or fresh vegetables too early, the steam from those ingredients will soak into the crust, making it soggy and unappealing.
Troubleshooting Common Issues
Even with the right cheese, you might encounter specific textural issues. Here is how to troubleshoot them in real-time.
Issue: The crust is crispy but the bottom is oily.
Solution: You likely used a cheese with too much fat or didn't bake it long enough during the pre-bake phase. Next time, use a higher percentage of Parmesan and ensure the crust is deeply golden before adding toppings. You can also try "blotting" the crust with a paper towel after the initial bake to remove excess oil before adding your sauce.
Issue: The crust is hard and crunchy, but not "chewy."
Solution: You likely used too much hard cheese (like Parmesan) and not enough melting cheese (like Cheddar). To get a better texture, mix a hard, aged cheese with a slightly younger, more pliable cheese. This provides both the structural strength and the desired mouthfeel.
Issue: The crust breaks when I try to lift it.
Solution: This is a sign of insufficient protein structure. You may have used too much fat or too little cheese. If you are using an egg to bind your crust (a common keto technique), ensure you are using enough egg white. The egg white provides the albumin that acts as a structural binder, helping the cheese hold its shape.
Summary Checklist for Success
Before you start your next keto baking session, run through this quick checklist to ensure you won't end up with a greasy mess:
- Is my cheese aged? (Prefer aged cheddar or parmesan over fresh/soft cheeses).
- Did I grate it myself? (Avoid the starch in pre-shredded bags).
- Am I using parchment paper? (Essential for heat control and easy removal).
- Am I pre-baking the crust alone? (Crucial for moisture evaporation).
- Is my oven temperature moderate? (Avoid the temptation of ultra-high heat).
By treating your cheese crust as a structural component rather than just a pile of melted fat, you can move away from the "militant" keto mindset and back into the joy of eating food that actually tastes good. Cooking is a science, and once you master the variables of moisture, heat, and protein, your low-carb kitchen will be a much more successful place.